|
Photo
number
|
Description
|
|
|

|
View from junction of British
and French troops toward Russian positions, river is right under the hill line.
|
|
|
|
View to the redoubt from
directly across the Alma, it is right behind the bushes.
|
|
|
|
The view almost due west along
the Alma river stream bed, toward the sea, which is just behind the bluff to
the right of the large tree. The French crossed this section of the Alma.
|
|
|
|
View as British approached the
great redoubt
|
|
|
|
View from St Armand location,
SE, toward hill on which Lord Raglan stood
|
|
|
|
View from same location looking
more due south
|
|
|
|
View from same looking more west
|
|
|
|
View from same looking still
further west
|
|
|
|
View from initial British
deployment on road to south as they crossed the final ridge and could see
Kourgane Hill.
|
|
|
|
View from road junction looking
south
|
|
|
|
View to right of #14
|
|
|
|
View across village looking to
right of #15
|
|
|
|
View from left flank of British
lines
|
|
|
|
Closeup of memorial oblisk in
redoubt. British assault positions are on low ground behind this slope.
|
|
|
|
View south from road toward
great redoubt and Kourgane Hill
|
|
|
|
View from obelisk inside
redoubt, monument to Fusiliers is on right side at forward edge of redoubt.
|
|
|
|
Close up of memorial to Royal
Welsh Fuisliers
|
|
|
|
Close up of memorial to Royal
Welsh Fusiliers
|
|
|
|
View north east from location of
Borodino Regt
|
|
|
|
View from right front corner
inside redoubt toward river
|
|
|
|
View from the back side of the
redoubt toward river and British line
|
|
|
|
View from St Armand location,
like #1
|
|
|
|
View left of 31, toward redoubt
|
|
|
|
View from redoubt back to SE
toward hill
|
|
|
|
View from in front of location
of Suzdal Regt on Russian right
|
|
| |
|
View from location in front of
Russian right flank looking west to the Russian left flank on the ridge line in
far distance.
|
|
| |
|
View from in front of Right flank
of Russian lines toward the British deployment across the river which is on
edge of the modern village and trees.
|
|
| |
|
Another view from in front of
Russian lines toward the British deployment where the village is now located.
|
|
| |
|
View toward the Russian right
wing - the Highlanders crossed these gentle slopes at an angle from lower left
corner toward upper right corner.
|
|
|
|
View more to east from #34
|
|
|
|
View toward Kourgine hill -
right on #34
|
|
|
|
View toward British approaching
highlanders from same location #34
|
|
|
|
View west from field where
Suzdal Regt and Highlanders met toward redoubt over ridge
|
|
|
|
Now from the opposite end of the British
line - View from Lord Raglan's position to NE
|
|
|
|
View from Lord Raglan's position east toward
redoubt
|
|
|
|
View from Lord Raglan's position SE into
pass
|
|
|
|
View from Lord Raglan's position NE back
into village
|
|
|
|
View from Lord Raglan's position back into
allied lines
|
|
|
|
View from Lord Raglan's position east to
redoubt
|
|
|
|
View from location of Borodino Regt to north
|
|
|
|
View from Borodino Regt, NE, right of #86
|
|
|
|
View from Borodino Regiment, right of #87,
NE
|
|
|
|
View from bluff at seacoast looking north
|
|
|
|
View along bluff toward east
|
|
|
|
View from bluff looking down to river
|
|
|
|
View toward west
|
|
|
|
View toward west from road in center
|
|
| |
|
View from the center-left of British
deployment toward the Russian great redoubt on Kourgane hill - of course the
buildings in the photo were not there.
|
|
| |
|
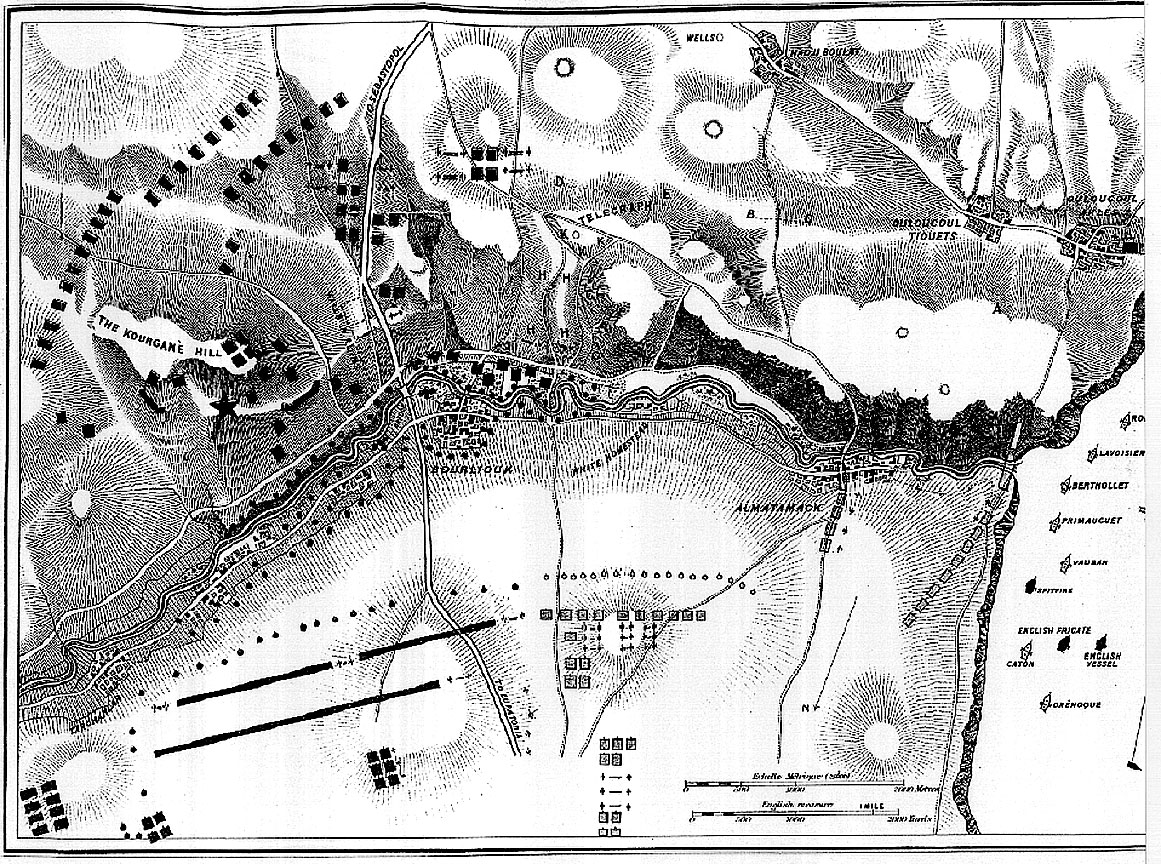
An expanded section of the map showing the
Kourgane Hill and the Russian great redoubt in its front. Russian and British
skirmish lines are close to the Alma river. The large star on the right is the
location where Lord Ragland posted himself with a cannon. The photographs show
how lengthy this battlefield was with the Russian battalion masses scattered
long the ridges
|
|
| |
|
View from center-right of the British
deployment line facing Kourgane hill in distance - the Alma river is behind the
trees and village.
|
|
| |
|
View from far left of the Russian positions
on ridge above the Alma river - close to the sea - the French easily ascended
the ridge
|
|
| |
|
Memorial to the Royal Welsh Fusiliers who
died at the Alma
|
|
| |
|
Alma battlefield looking west toward sea from
a central position between the Russian and British lines
|
|
| |
|
This is the right side of the Kinglake map.
The French attack south across the river and up the ridge. Lord Raglan moved to
a hilltop within the Russian lines shown by the large star at left edge. The
British attack on the left against the Great Redoubt and troops on Kourgane
hill is not shown on this detail. We see the French (Bosquet) turned the
Russian left. Canrobert's artillery could not make it up the ridge so was
shifting to the right.
|
|
| |
|
More detailed blowup of one of Kinglake's
maps showing the British attack against the Russians defending the Kourgane
hill and ridge line, and the French attacking the ridge above the Alma river on
the right. Russian Commander Prince Menshikov is at small star near road at top
- Lord Raglan is at larger star on hill in center - St. Armand is at small star
just north of Alma river in center
|
|
| |
|
A detail of the right flank of the French
attack - Bousquet has surmounted the ridge and deployed. Canrobert also has
deployed on the height and Forey is moving west to support Bosquet. Canrobert's
artillery could not climb the ridge with him but rapidly moved west, then did
surmount the ridge and came into action on his right flank just in time to
repel the Russian counter-attack.
|
|
| |
|
Kinglake map - first storm of Great Redoubt
at Alma battle
|
|
| |
|
Alma battlefield - map showing the center and
right of the field - on the right flank the French are climbing the lightly
defended ridge and Canrobert's brigade has surmounted the ridge and will be
counter attacked by Russian battalions in mass formations. St. Armond is at the
river with Prince Napoleon's brigade on the French left. Lord Ragland has
risked all to move into the Russian skirmish line on a hill adjacent to the
road. The British are begining to attack the Russian right flank on Kourgane
Hill and their great redoubt but the Highland Division has not yet reached the
battalion mass of the Russian Souzdal Regiment
|
|
| |
|
Kinglake map - 2nd fight for Kourgane hill -
Guards and Highlanders at Alma - note the three Highland Regiments - 42nd,
93rd, and 79th - attacking in echelon over rolling terrain shown in photos -
Their firepower from line formation was deadly to Russians formed in battalion
masses.
|
|
| |
|
Kinglake map - Highland division continues
the attack at Alma battle
|
|
| |
|
Kinglake map - Russian column of 8 bns start
counterattack against French at Alma.
|
|
| |
|
Kinglake map - Russian column of 8 bns under
French arty fire at Alma
|
|
| |
|
Beskrovni map Sept 20, 1854, overall view in
Crimea, inset shows allied march from landing at Evpatoria. - note significant
difference showing on Russian left flank. And he does not show location of Lord
Raglan, who was standing on the hill just north-west of the Borodinski Regiment
- The Russian great redoubt is the short artillery line just north of the
Yegerski and Vladimirski regiments
|
|
| |
|
Beskrovni map Sept 20, 1854, overall view in
Crimea, inset shows allied march from landing at Evpatoria - The red lines show
Menshikov's initial withdrawal of his field army from Sevastopol to
Bakhchesarai - note his rear guard just passed the Mekenzi Farm as the Allied
advance guard crossed behind it. Then other red lines show Menshikov's return
to occupy the "north fort' and establish a position at Chorgun.
|
|
| |
|
|
|